Best DTF transfer sizes for small batch apparel orders
Best overall: garment-measured full-front transfers. Best for repeat uniform orders: left-chest transfers. Best for mixed-size runs: placement-specific transfers rather than one size across every garment. This 2026 guide explains the best DTF transfer sizes for small batch orders by placement, garment fit, and file-preparation workflow.
TL;DR
The best DTF transfer sizes for small batch orders follow garment measurements, not a universal size chart.
Choose full-front transfers for a primary graphic and left-chest transfers for compact uniform branding.
Brooklyntransfers offers DTF transfers by size and gang sheets for print shops ordering different artwork sizes.
Proof each placement at actual size before duplicating artwork across a gang sheet.
Why this matters
A transfer can fit inside a garment's printable area and still look wrong. A wide graphic on a narrow shirt, tiny lettering on a chest logo, or artwork crossing a pocket creates a production problem before the press closes.
Brooklyntransfers DTF transfers suit print shops that need separately sized artwork for mixed-placement apparel orders. Use DTF Transfers by Size when ordering individual designs; decide their finished dimensions before preparing the order.
For your 2026 production worksheet, record the garment, placement, finished artwork dimensions, and quantity together. A filename alone does not tell your operator whether the artwork belongs on a sleeve or a full back.
What makes the best DTF transfer sizes?
Garment fit: Measure the actual blank, not just the size label. Check the smallest and largest garments in the order.
Placement clearance: Keep the intended graphic inside a usable pressing area, clear of seams, pockets, collars, and other obstructions.
Artwork proportions: Preserve the design's aspect ratio. Set width and let height follow unless the artwork itself needs revision.
Detail readability: Inspect lettering, thin lines, and separated elements at finished size, not only while zoomed in.
Production repeatability: Record approved dimensions and placement references so a reorder does not restart the sizing decision.
Sheet organization: Group artwork so the operator can identify, cut, and assign each transfer without guessing.
Best DTF transfer sizes at a glance
These rankings compare sizing approaches, not fixed dimensions or performance-test results. The right measurement comes from your garment and artwork.
Rank
Transfer placement
Best for
Sizing approach
Standout benefit
Key limitation
1
Full front
Primary graphic tees
Measure the front panel and proof the artwork at finished size
Gives the main design a clear focal point
One width does not suit every garment cut
2
Left chest
Repeat uniform branding
Size the logo against the chest area and nearby seams
Keeps branding compact and consistent
Detailed lettering becomes harder to read when reduced
3
Full back
Information-led apparel
Size the complete layout against the usable back panel
Separates larger information from the front
Long layouts need a height check as well as a width check
4
Sleeve
Secondary branding
Measure the usable sleeve area on the actual blank
Adds a separate placement without enlarging the front
Seams and sleeve shape restrict placement
5
Inside neck
Brand-identification artwork
Proof a simplified design inside the available neck area
Keeps identification separate from the exterior graphic
Small lettering and limited space require careful checks
1. Full front: best DTF transfer sizing for primary graphics
Full-front sizing starts with the garment panel and the shape of the graphic. A narrow illustration and a wide wordmark need different dimensions even when both go on the same shirt.
Measure the usable front, then position an actual-size paper proof. Check the design on the garment rather than treating a rectangular file boundary as the final visual result.
Full-front pros:
Gives your main artwork a defined focal point.
Accommodates different graphic shapes without forcing identical dimensions.
Lets you approve the design's relationship to the neckline and side seams.
Full-front cons:
A width approved on one blank does not establish fit on another cut.
A large solid graphic creates a different feel from an open design.
Best for: Graphic-led apparel where the front design carries the message.
For a mixed-size 2026 run, inspect the smallest and largest blanks before deciding whether one transfer size works throughout. Keep one size only when both proofs support that decision.
Verdict: Buy after the full-front proof fits the actual garment range.
2. Left chest: best DTF transfer sizing for repeat uniforms
Left-chest transfers work as compact identifiers rather than miniature versions of a full-front graphic. Size the logo for its own proportions, then check its relationship to the placket, pocket, sleeve seam, or centerline.
Do not shrink every element automatically. A small tagline that reads well on screen can lose its purpose when the logo reaches its finished garment size.
Left-chest pros:
Keeps the main garment front visually open.
Gives repeat orders a clear placement to document.
Works as a separate artwork version from a larger back graphic.
Left-chest cons:
Fine lettering needs inspection at actual size.
Pockets and garment construction limit where the design can sit.
Best for: Staff shirts, team apparel, and repeat orders built around a compact logo.
Save the approved chest artwork separately from the full-front master. That prevents a later operator from resizing the wrong version just because the files share a logo.
Verdict: Buy a chest-specific version; skip an unreadable reduction of the main graphic.
3. Full back: best DTF transfer sizing for information-led apparel
Back transfers suit layouts that need more room than a compact chest mark. Start with the entire composition, including any text beneath or above the main graphic, and measure both its width and height.
A design that fits across the back can still extend too far down the garment. Proof the complete layout rather than approving its widest element alone.
Full-back pros:
Keeps larger information separate from front branding.
Accommodates a distinct back layout instead of an enlarged chest logo.
Makes the relationship between graphic and supporting text easier to assess.
Full-back cons:
Tall artwork needs a separate vertical placement check.
Hoods, seams, and garment construction affect the usable area.
Best for: Apparel with a main back graphic or a combined graphic-and-text layout.
Review a back proof with the garment laid naturally. If the order includes hooded garments, check how the hood sits against the intended artwork before approving placement.
Verdict: Buy after checking the complete back layout, not width alone.
4. Sleeve: best DTF transfer sizing for secondary branding
Sleeve transfers need their own sizing decision. Measure the actual sleeve and identify a flat, accessible pressing area before choosing the artwork dimensions.
A horizontal wordmark and a compact symbol do not occupy the sleeve in the same way. Rotate a paper proof into the intended orientation and inspect its distance from seams and the sleeve opening.
Sleeve pros:
Adds a distinct secondary branding position.
Keeps supporting artwork separate from the main graphic.
Lets you select a compact mark specifically for the placement.
Sleeve cons:
Sleeve seams and shape restrict the usable area.
Placement needs its own setup rather than sharing front-position references.
Best for: Secondary logos or marks that should remain separate from the main design.
Record the sleeve side and artwork orientation in the order notes. A correct transfer size does not prevent a left-versus-right placement error.
Verdict: Buy only after confirming sleeve access and orientation on the blank.
5. Inside neck: best DTF transfer sizing for brand identification
Inside-neck artwork is a separate design task, not leftover space on a gang sheet. Start with the information you need, then simplify the layout to fit the usable area beneath the collar.
Check readability and follow the transfer's application instructions for the chosen garment. Brand artwork also does not replace any labeling information your garment must retain.
Inside-neck pros:
Separates brand identification from exterior graphics.
Encourages a purpose-built, simplified artwork file.
Gives repeat orders a distinct placement specification.
Inside-neck cons:
Small text leaves little room for unnecessary detail.
The neckline and existing labels restrict positioning.
Best for: Brand-identification artwork prepared specifically for an interior placement.
Keep required garment information intact. If your design needs more space than the placement provides, revise the content or choose another location rather than compressing the artwork.
Verdict: Hold until the simplified proof is readable and the placement is suitable.
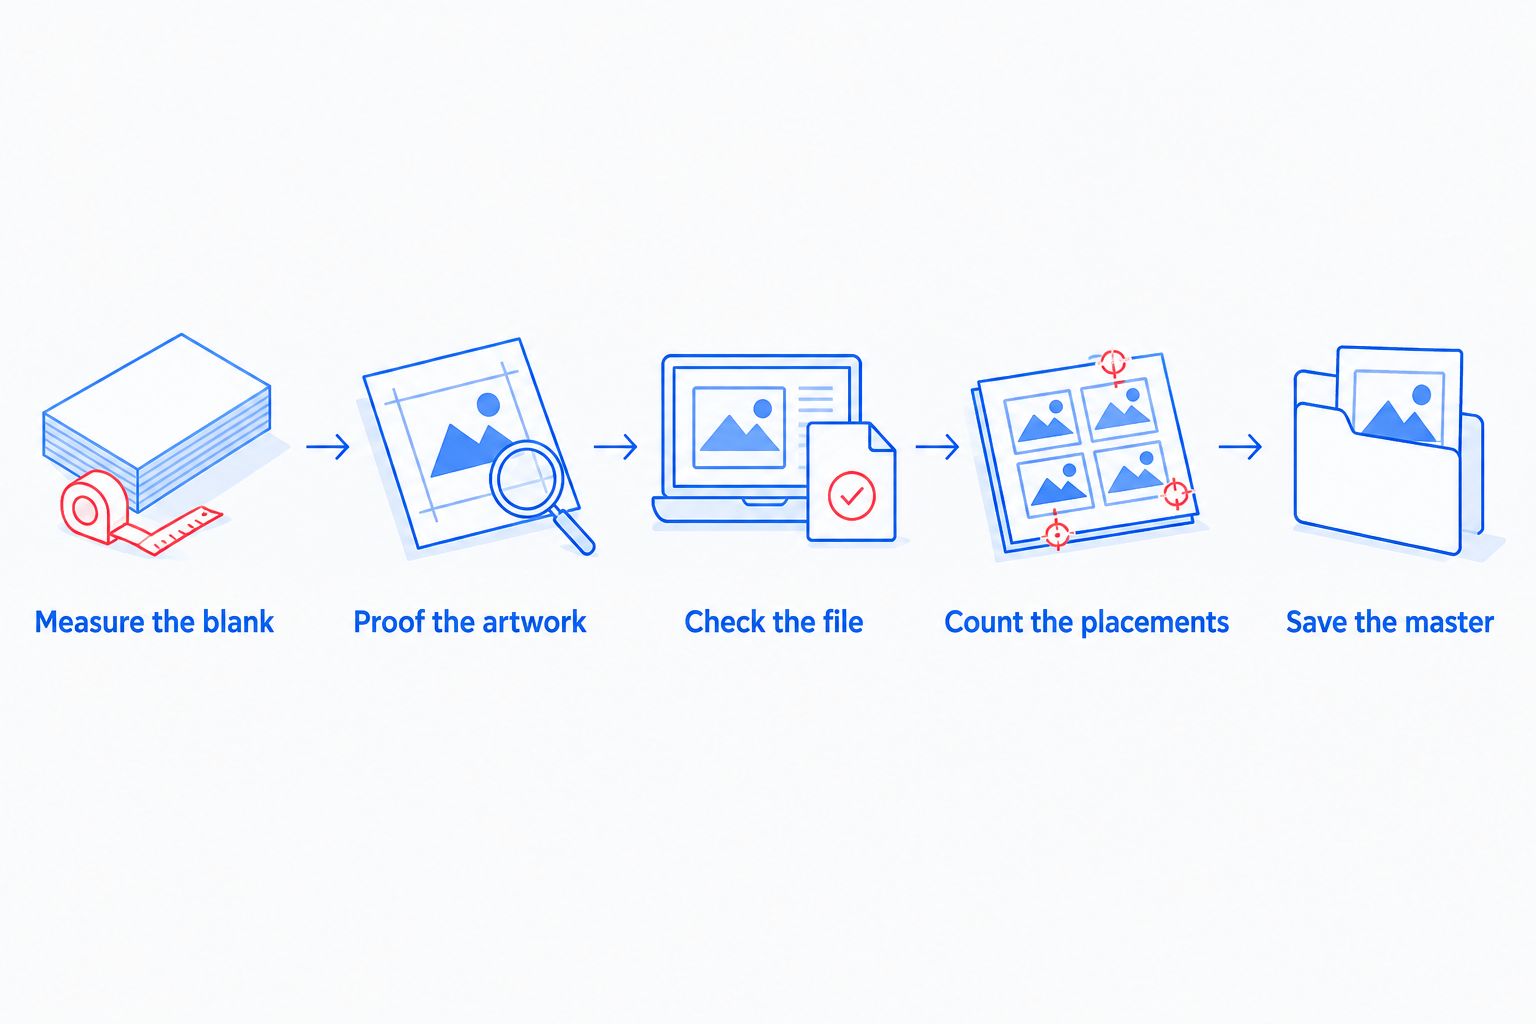
How to turn garment measurements into an order-ready file
Use this sequence for your 2026 repeat-order template. Resolve dimensions before building the sheet; arranging unapproved artwork only makes the correction larger.
Measure the blank
Lay out the actual garment and identify the usable placement area. Record width and height in a consistent unit, with a placement reference your operator can reproduce.
If your worksheet uses centimeters but the artwork document uses inches, 1 inch equals 2.54 centimeters. Convert before export so the document and order describe the same finished size.
Proof the artwork
Print a paper version at actual size and position it on the garment. Check the shape, readable detail, neckline spacing, and clearance from construction features.
Inspect a compact logo from a normal viewing distance as well as up close. A design that requires magnification to read needs revision before production.
Check the file
Set the artwork to its approved physical dimensions and inspect the export. For raster artwork, 300 pixels per inch is a common print-preparation target; confirm the product's current file requirements before submitting.
Increasing a low-resolution file to 300 pixels per inch does not restore missing detail. Return to the original artwork when the export looks soft.
Count the placements
Count transfers by design and placement, not by garment total alone. A shirt with front and back artwork needs each placement represented in your order worksheet.
Keep different approved sizes distinguishable in filenames and production notes. Do not depend on visual similarity to identify them after cutting.
Save the master
Save the approved artwork, finished dimensions, quantity breakdown, and placement proof together. Preserve a separate editable master so the next order starts from a known specification.
Approve the physical size before duplicating artwork for production.
Choose the ordering method after approving the sizes
Individual designs: Use transfers by size when you want to order artwork at its approved dimensions. Keep the quantity for each design and placement explicit.
Separate files: Use Build Your Gang Sheet when your artwork remains in multiple individual files. Its stated purpose is to arrange separate images onto a gang sheet; your preparation task is to supply the correct versions and dimensions.
Finished sheet: Use Upload Your Gang Sheet when the images are already arranged together. Check the final sheet dimensions, artwork counts, and export before submission.
Brooklyntransfers offers these ordering routes for DTF transfers and gang sheets. Choose according to your file state, not because a gang sheet seems like the automatic choice for every small order.
Submit artwork already arranged together in one image.
$10
How these sizing approaches rank
Full front ranks first as the default for a primary graphic; left chest wins for compact repeat branding. Back, sleeve, and inside-neck placements each solve a different layout need.
The criteria are garment fit, placement clearance, artwork proportions, readability, and repeatability. This is a placement-based buying guide, not a claim that one measurement fits every blank.
Which DTF transfer size should you choose?
Choose the size that passes an actual-size proof on your garment. Start with the full front for a main graphic or left chest for compact branding, then size secondary placements separately.
For 2026 scheduling, Brooklyntransfers states that DTF orders placed by 1:00 PM Eastern ship or are ready for pickup the same day. That describes dispatch or pickup readiness, not delivery to your shop; keep transit separate from your pressing schedule.
FAQ
What's the best DTF transfer size for a small batch order?
The best DTF transfer size is the finished dimension that fits your actual garment and intended placement. Measure the blank and approve an actual-size proof before ordering.
Should I use the same DTF transfer size on every shirt?
Use one size only when the artwork fits and looks right across the garments in your order. Check the smallest and largest blanks before approving a shared dimension.
What's the best size for a left-chest DTF logo?
Size a left-chest DTF logo against the actual chest area, nearby seams, and the logo's proportions. Inspect lettering at finished size rather than shrinking a full-front design automatically.
Should I order transfers by size or build a gang sheet?
Order transfers by size for individually specified artwork, or build a gang sheet when arranging multiple separate files. Upload a gang sheet when your artwork is already assembled into a finished sheet.
Does changing the resolution fix blurry DTF artwork?
Changing the resolution setting does not restore missing image detail. Use the original artwork and inspect the export at its intended physical dimensions.
Does same-day shipping mean my transfers arrive that day?
No. Brooklyntransfers states that DTF orders placed by 1:00 PM Eastern ship or are ready for pickup the same day; same-day dispatch is not same-day arrival.
One last thing
Empty space inside an artwork file can make its stated dimensions misleading. Check the visible design's bounds as well as the canvas size before you order.
For your next 2026 reorder, retain the approved proof with the production file. That reference is more useful than relying on a remembered width.